

Hair & Makeup Masterclass — Lecture 7: Eyeshadow Placement & Blending (Eye Prep, Shape Mapping, and Seamless Finishes)
A beautiful eye look is rarely about using more shadow. It’s about placing color with intention, blending edges with patience, and shaping the eye in a way that feels flattering and balanced. This lecture is designed to give you that control. You’ll learn how to prep the eye, map placement by eye shape, build depth without muddiness, and finish with liner and lashes in a way that feels modern and wearable.
If base makeup makes the skin look polished, eye placement makes the face look expressive. This is where artistry meets structure. Tiny placement choices can make eyes look lifted, brighter, more open, softer, smokier, or more defined. Once you understand this system, you stop guessing and start creating eye looks that are repeatable on real clients in real lighting.
Whether you are building your confidence as a freelance makeup artist, growing your standards to match what clients expect from a makeup artist Miami, or learning in a way that mirrors a strong makeup school Miami and hair and makeup school Miami environment, this lecture will sharpen one of the most client-visible parts of your work.
Masterclass Series: This is Lecture 7 of the 30-lecture Hair & Makeup Masterclass.
Register now to schedule your next personalized training session with Raquel. Click here to register and one of our representatives will contact you.
Click Here to RegisterFeatured image tip: Use your Lecture 7 cover as the WordPress Featured Image. The two images below are in-post visual guides.
What You’ll Learn in Lecture 7
- How to prep eyelids for smooth blending and long wear
- How to map transition, depth, and highlight by eye shape
- How to blend without muddying tones
- How to layer mattes and shimmers with intention
- How to create soft daytime, lifted glam, and smoky evening eyes
- How to choose liner and lashes for each eye goal
- How to troubleshoot patchiness, fallout, asymmetry, and harsh edges
- How to communicate eye-look choices in a warm, client-friendly way
- Practice drills to build consistency, symmetry, and speed
Table of Contents
- The Eye Artistry Mindset
- Eye Prep for Smooth, Long-Wear Results
- Placement Mapping by Eye Shape
- Blending Method That Keeps Color Clean
- Matte vs Shimmer: Where Each Belongs
- Three Signature Eye Looks
- Liner + Lash Strategy
- Common Mistakes and Fast Fixes
- Miami Pro Notes (Heat, Humidity, Flash)
- FAQ
- Practice Assignment
- Register for Mentorship
The Eye Artistry Mindset
Great eye makeup isn’t random color placement. It’s architecture. You are creating shape, depth, and light. If you think in zones instead of products, your results get cleaner immediately.
The four core zones are:
- Transition zone: soft color that prepares blending and sets shape direction.
- Depth zone: darker tone for structure, usually on the outer third/crease area.
- Light zone: shimmer/satin/matte light tones to open or spotlight.
- Definition zone: liner/lash line work to frame the eye.
When these zones are placed intentionally, your work reads polished and professional. When they are misplaced, eyes can look heavy, uneven, or smaller than intended. This lecture gives you a clean repeatable map so you can work with confidence.
Eye Prep for Smooth, Long-Wear Results
Most blending problems begin before shadow even touches the lid. If the lid is too oily, too dry, or unevenly prepped, shadow skips, clings, or turns patchy. Prep is not optional in pro work.
Step 1: Balance the lid
Start with minimal skincare on the lid area. Too much cream can break down shadow later. If skin is dry, use a tiny amount of lightweight hydration and let it absorb fully. If oily, lightly blot before primer.
Step 2: Prime intentionally
Use a thin layer of eye primer or a suitable base product. Thin is key. Too much product causes creasing and patchiness because powders grab unevenly. Let primer set for a few seconds before shadow.
Step 3: Lock prep with a soft set
For smoother blending, lightly set the upper lid and brow bone with a skin-toned matte powder. Keep the mobile lid flexible if you plan to use shimmers or cream shadows that need grip.
Step 4: Choose your blend direction before color
Decide whether the look is rounded, lifted, soft glam, or smoky. Your blend direction should match that goal from the first brush stroke. If you start blending in random directions, it’s harder to recover clean shape later.
Placement Mapping by Eye Shape
Eye shape mapping is the difference between “pretty shadow” and “flattering, customized artistry.” You don’t need rigid rules, but you do need placement awareness so every client gets a look that suits them.
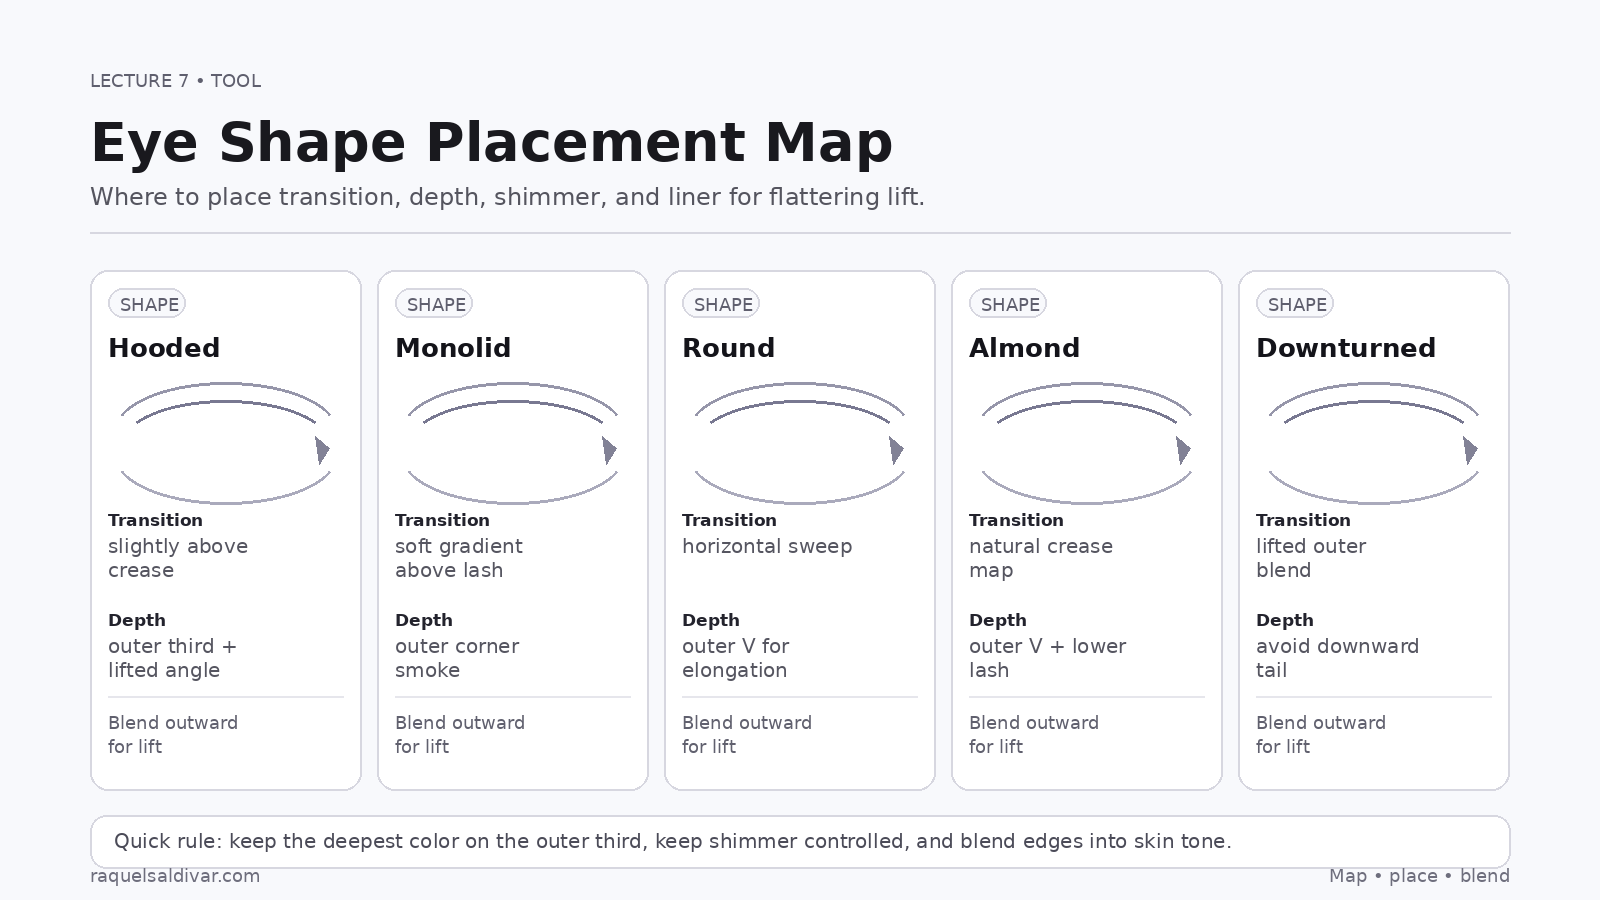
Hooded eyes
Bring transition slightly above the natural crease so color remains visible when eyes are open. Keep depth on the outer third and blend upward/outward for lift. Keep shimmer controlled on the center lid so it brightens without exaggerating texture.
Monolid eyes
Use gradient placement rather than traditional deep crease mapping. Build dimension with soft tonal shifts from lash line upward. Keep outer corner depth for shape, and use liner strategically to define without making eyes feel smaller.
Round eyes
A horizontal blend and outer-corner depth can create elongation. Keep strong darkness away from the inner third. Use a lifted outer blend and balanced lower lash shading to create sleek shape.
Almond eyes
Almond shapes are versatile and can wear many looks. Focus on balance and clean transitions. Outer V placement works beautifully here, with options for soft daytime or bold glam.
Downturned eyes
Keep the deepest tones and liner direction lifted toward the brow tail. Avoid dragging dark color downward at the outer corner. A lifted placement instantly brightens expression and makes eyes look more open.
Blending Method That Keeps Color Clean
Blending is not about aggressively buffing everything together. It’s controlled softening of edges while preserving placement.
The clean 5-step blend method
- Place transition first using a mid-tone matte and a fluffy brush.
- Add depth second with a smaller brush on the outer third/crease zone.
- Blend borders, not centers so depth stays where you placed it.
- Reinforce depth lightly if blending softened too much structure.
- Finish with a clean brush pass to erase harsh outer edges.
Key principle: small brush = placement, larger brush = diffusion. If you try to place detail with a large brush, shape gets muddy fast.
How to avoid muddiness
- Limit yourself to 2–3 matte tones before adding shimmer.
- Use wipes/towel to clean brushes between tones.
- Build depth in thin layers rather than one heavy layer.
- Return to transition shade to soften, not to dark shade.
Matte vs Shimmer: Where Each Belongs
Matte shades shape the eye. Shimmer shades attract light and attention. When texture placement is intentional, eye looks feel dimensional and expensive.
Matte placement
Use mattes in transition and depth zones. Mattes are your structure tool and should carry the shape of the look. Even glam looks look cleaner when matte structure is built first.
Shimmer/satin placement
Place shimmer where you want brightness—often center lid or inner third. Keep shimmer controlled for mature lids or textured lids. A finely milled satin can look smoother than a chunky sparkle.
Inner-corner brightness
A tiny inner-corner highlight can make eyes look awake quickly. Keep placement small and strategic. Over-bright inner corners can dominate the look in photos.
Ready to Perfect Your Eye Looks with One-on-One Coaching?
Register now to schedule your next personalized training session with Raquel. Click here to register and one of our representatives will contact you.
Click Here to RegisterThree Signature Eye Looks (Step-by-Step)
Look 1: Soft Everyday Lift
- Prime lightly and set brow bone.
- Apply soft matte transition in upper crease zone.
- Add slightly deeper matte on outer third.
- Use small amount of satin on center lid.
- Tightline upper lash line, add mascara.
- Optional half-lash for subtle lift.
This look is ideal for daytime appointments, natural glam requests, and clients who want polished eyes without heavy definition.
Look 2: Lifted Soft Glam
- Map outer lift angle before shadow.
- Build transition with warm-neutral matte.
- Place medium-deep matte on outer V and diffuse upward.
- Use shimmer on center/inner lid with finger or flat brush.
- Add thin-to-medium liner wing aimed toward brow tail.
- Finish with wispy lash style focused on outer half.
This look photographs beautifully and works for events where clients want definition without looking too heavy.
Look 3: Modern Smoky Definition
- Lay down mid-tone matte transition.
- Add deeper matte close to lash line and outer crease.
- Smudge pencil liner along upper lash line.
- Blend liner edge softly into shadow (no harsh line).
- Add controlled shimmer or satin on center lid.
- Balance lower lash line with soft smoke, then mascara/lashes.
The modern smoky eye is diffused and elegant, not over-blackened. Keep contrast intentional and edges polished.
Liner + Lash Strategy
Liner and lashes should support the eye shape and makeup goal. A heavier lash can cancel out soft shadow work if it’s too dense for the look. A wing that’s too long can drag the eye down. Strategy is what makes the full look harmonious.
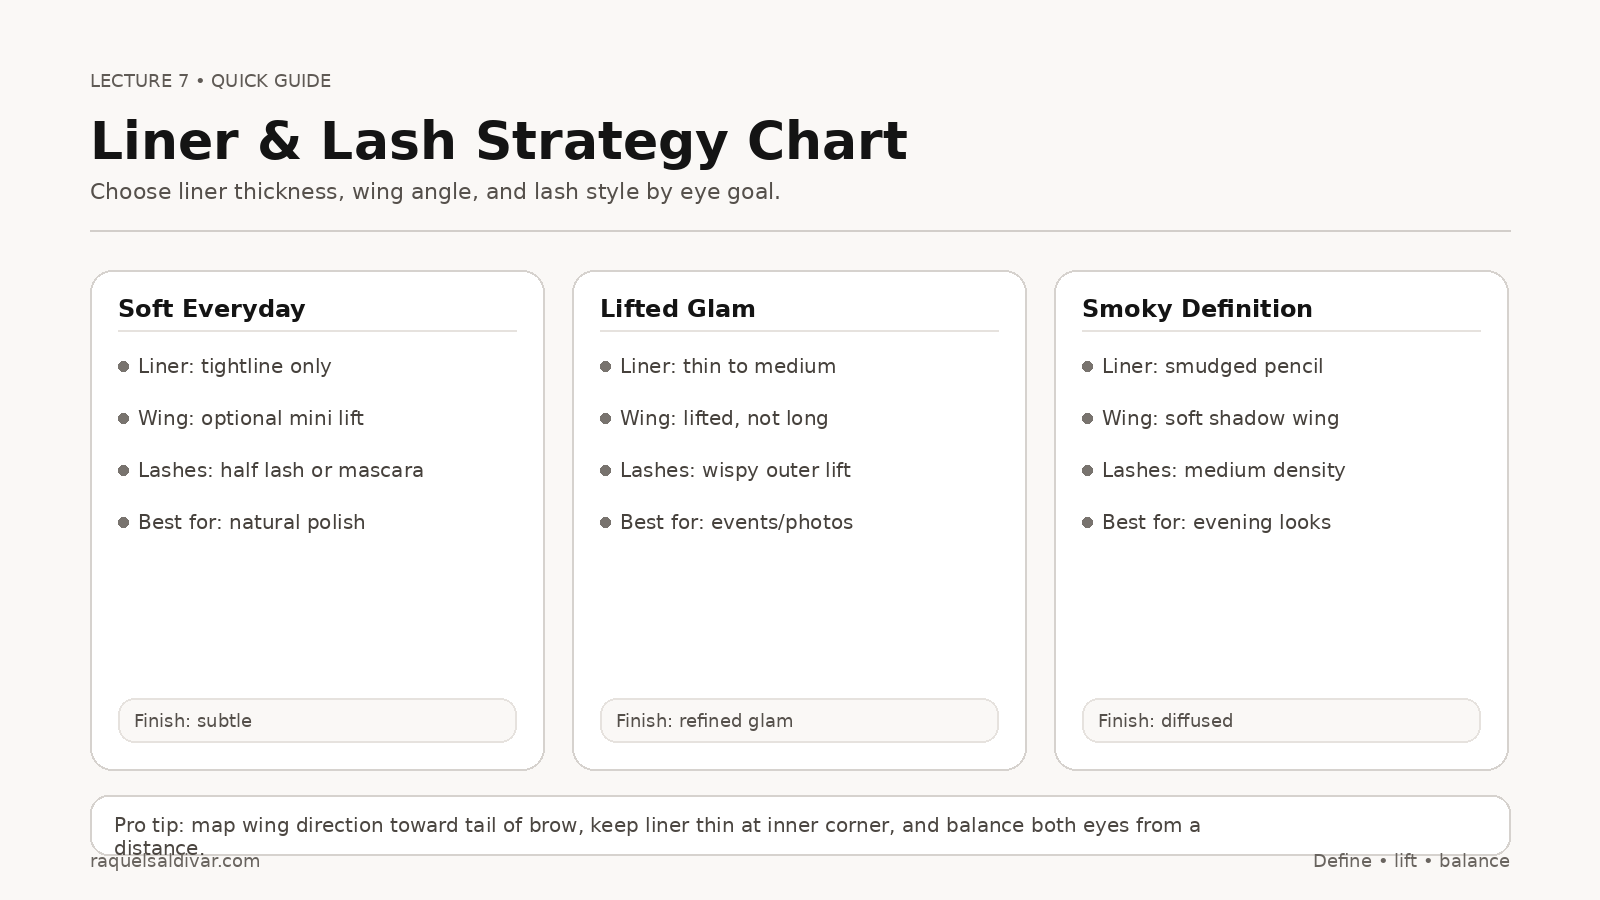
Quick pairing guide
- Natural polish: tightline + mascara or half lash.
- Lifted glam: thin/medium wing + wispy lash with outer lift.
- Smoky definition: smudged liner + medium density lash.
Always apply liner with eyes open intermittently to check direction and balance. What looks level with eyes closed can angle differently once open.
Common Mistakes and Fast Fixes
Issue: Shadow looks patchy
Usually caused by uneven prep, too much base product, or pressing dark shade too early. Fix with smoother prep, thinner layers, and gradual depth building.
Issue: Blend looks muddy
Too many colors or over-blending the center of placement. Return to a clean transition shade, soften borders, and re-place depth only where needed.
Issue: Eyes look uneven
Check symmetry from a distance, not only close-up. Correct one step at a time: transition height, depth angle, then liner direction. Don’t chase perfect “twins”; aim for balanced sisters.
Issue: Fallout under eyes
Use tap-off method, flatter brush loading, and press/pack motions for shimmers before blending. If needed, do complexion cleanup after eyes on very smoky looks.
Issue: Liner drags eye downward
Lift endpoint toward brow tail. Keep inner liner thin and avoid long heavy tails. A short lifted flick is often more flattering than a long dramatic wing.
Miami Pro Notes (Heat, Humidity, Flash)
In warm, humid conditions, eye longevity relies on layered control: primer, thin product layers, and strategic setting.
- Use less cream base on lids when humidity is high.
- Choose mattes with good grip and build shimmer in thin layers.
- Set where needed, but don’t over-powder textured lids.
- For photography, check shimmer intensity under direct light.
- Carry cotton swabs and a small detail brush for quick refinements.
This kind of practical control is what helps your work stay beautiful from first look to final photo.
FAQ
How many eyeshadow shades do I really need for a pro result?
Three is enough for most looks: transition, depth, and light. More shades can work, but they’re not required for beautiful, polished artistry.
Should I do eyes before or after foundation?
For soft looks, either works. For smoky or high-fallout looks, doing eyes first can make cleanup easier.
How do I make shimmer look smooth, not chunky?
Use finer textures, apply in thin layers, and press onto lid instead of sweeping aggressively. Keep shimmer placement controlled.
What if the client says “I’m bad at eye makeup”?
Use reassuring language and simple steps. Show them a version they can repeat at home. Confidence grows when the method feels approachable.
How do I keep eye makeup from creasing?
Thin prep, proper primer, layered powders, and avoiding heavy creamy products on oily lids. Also let each layer settle before adding the next.
Practice Assignment
Complete this practice sequence on yourself or a model:
- Create one soft everyday eye using 3 shades only.
- Create one lifted soft glam eye with defined outer structure.
- Create one modern smoky eye with diffused liner.
- Photograph each look in natural and indoor light.
- Write a short reflection: what placement looked most flattering and why.
Mini challenge: recreate your best look in 20 minutes without sacrificing blend quality. This builds speed while protecting your standards.
Register for Mentorship
If you want personalized feedback on your eye placement, blending technique, liner direction, and lash selection, register now and one of our representatives will contact you.
Your next session is tailored to your goals, your style, and your growth as an artist.
Educational content only. Always follow local guidelines and best practices.

Comments are closed